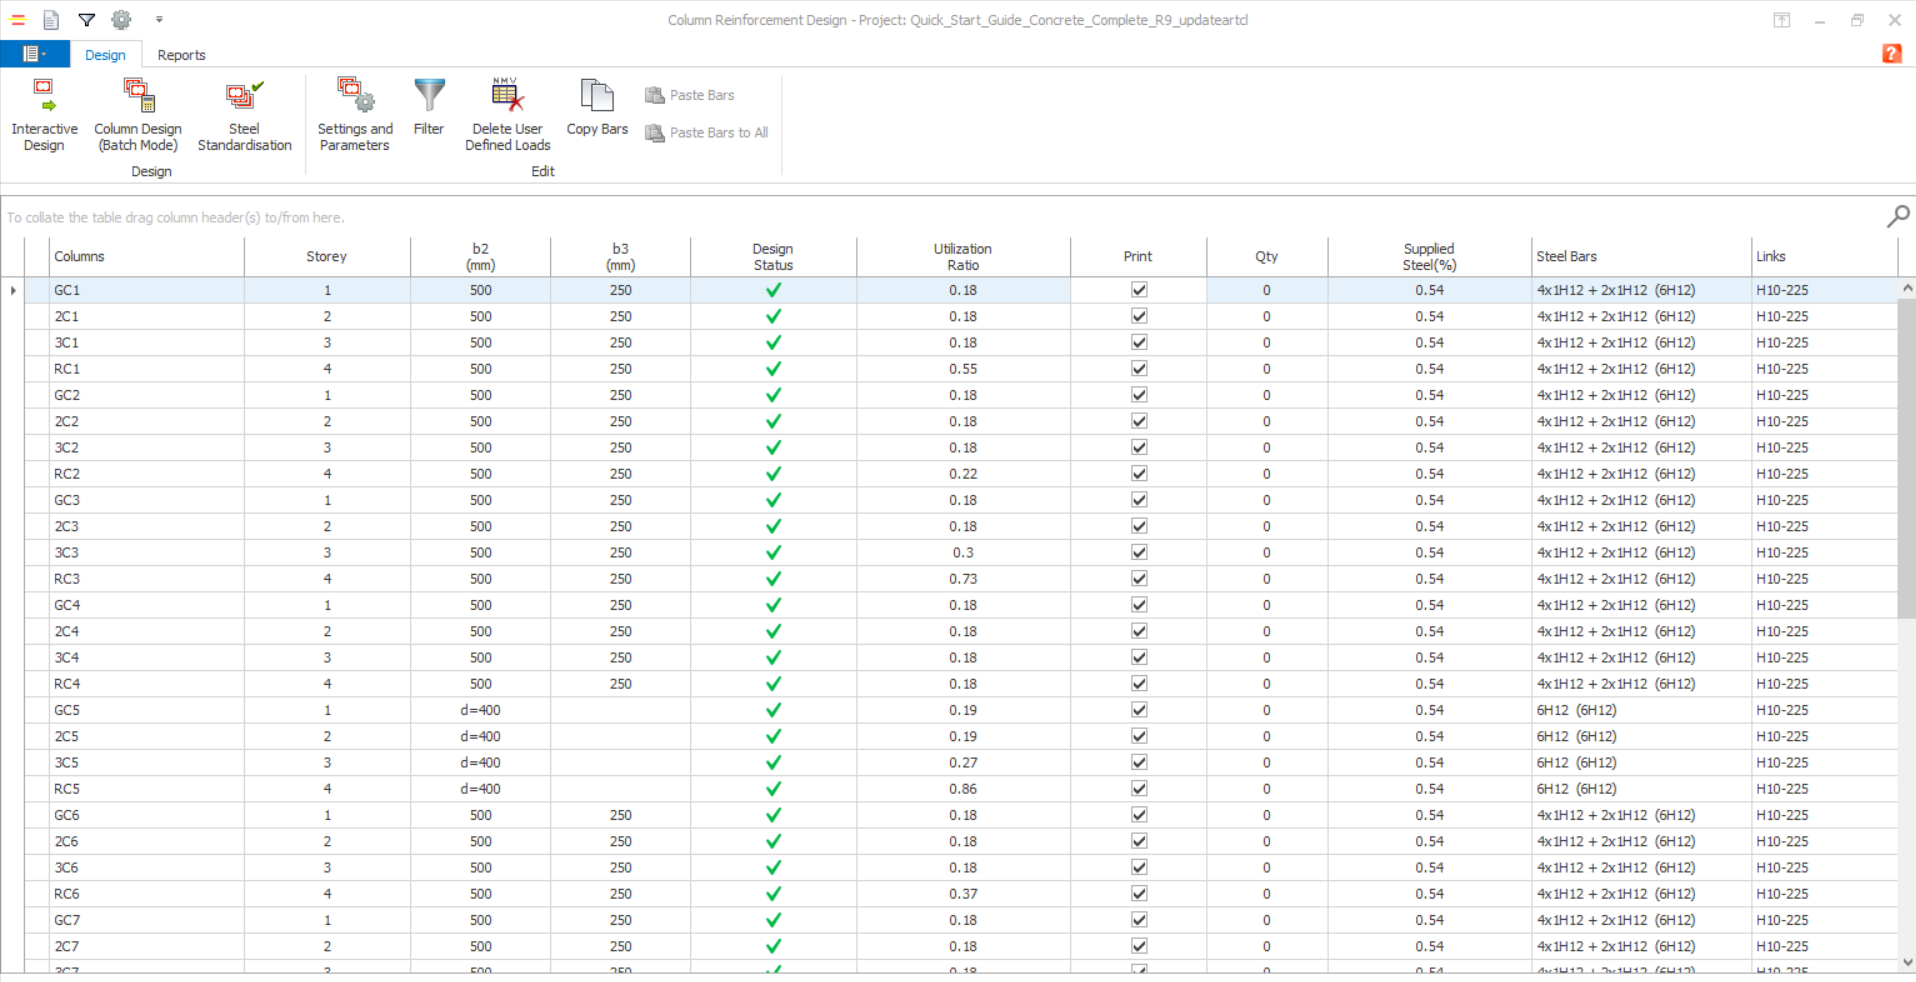
Overview Of The Column Summary Table
Design Tab
The summary table can be manipulated as follows:
To filter members

The following filtering options are provided:
- “Display All Members”
- “Filter by Storey”
- “Filter by Member Label”
- “List Failed Members Only”
- “List Only Columns”
- “List Walls Only”
- "List Basement Walls Only"
To return to a listing of all members choose the “Display All Members” option in the “Filter Axes” dialog.
 Alternatively, user can use the search function to find/locate the particular member by clicking the search icon
  in the top right corner, then input the member label.
 To sort the table into a different order
Initially the column summary table displays members sorted by member label, then Storey. You can sort in different ways by dragging “Design Status”, “Columns” or “Storey” column headers to the area indicted. The first header becomes the primary and the next becomes the secondary sorting criteria.
To remove a sorting criteria drag it back into the table header.
Copy and Paste Bars
“Copy Bars” and “Paste Bars”, located on the “Edit” tab, allows the designed bars from one member to be pasted to other members with similar geometry. A check design is then performed to establish if the pasted bars are sufficient.
Because no relation is established between the source and destination members, re-selecting bars would result in the members adopting different bars to each other once more.
Copy Bars
Using this button, steel bars from the selected member can be copied to the clipboard and can be pasted to members with similar geometry.
Select the member to copy and press the “Copy Bars” button. The member label will be marked by an arrow symbol and all members with similar geometry will be highlighted with an “=” mark.
Paste Bars
If a member is marked by an arrow symbol, then you can use this button to paste steel bars from it to other selected members.

A check design is carried out immediately after paste operation to check if the provided steel is sufficient and the tick/cross mark will be updated. User can refer this article:
Paste Steel Bars to All
If a member is marked by an arrow symbol, then you can use this button to paste steel bars from it to all the members marked with “=”.
A check design is carried out immediately after paste operation to check if the provided steel is sufficient and the tick/cross mark will be updated.
Column Design (Batch Mode) 
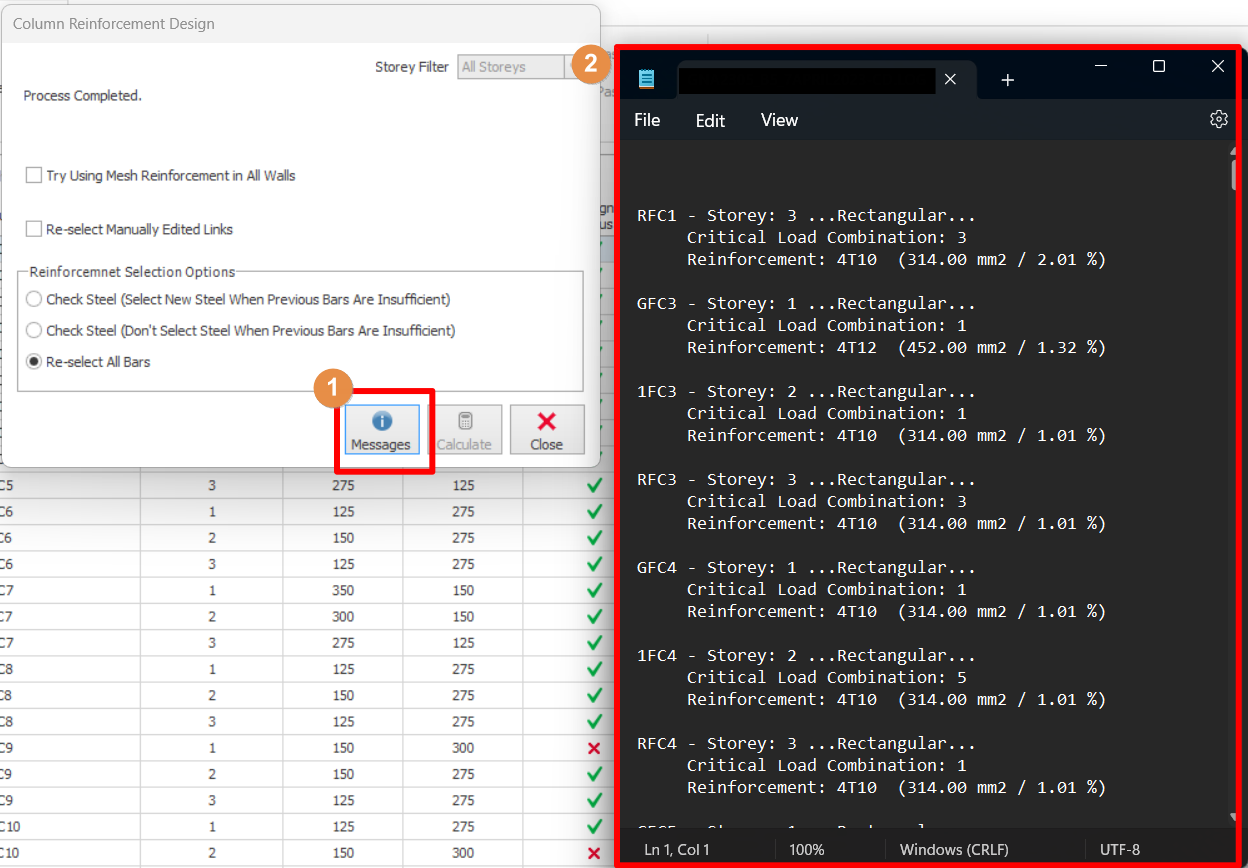
All columns and walls can be designed automatically in batch mode. If you select the “Column Design (Batch Mode)” option the “Column Reinforcement Design” dialog will be loaded. The parameters in this dialog control the column design in batch mode.
Reinforcement Selection Options
Batch mode column section design includes the following options:
- Check Steel (Select New Steel When Previous Bars are Sufficient): This option will not modify the previously selected bars, if the area ratio is sufficient for the new conditions. New reinforcement will be selected only if the bars are not adequate.
- Check Steel (Don’t Select New Steel When Previous Bars are Sufficient): This option will not modify the selected bars, no matter the bars are adequate or not. If the bars are inadequate, columns will be marked with a “X” sign.
- Reselect All Steel Bars: This option will delete all the available bars in the section and perform the column section design from scratch.
Review of Batch Design
A report in TXT format is generated during the batch mode design to inform the user of any problems during the design process. You can review this report by pressing the “Messages” button in the “Column Reinforcement Design” dialog.
After closing the “Column Reinforcement Design” dialog the summary table is redisplayed. The “Design” and “Print” columns in the table will be marked for those members that have been designed successfully and the steel bars and links provided will be listed.
The Utilization Ratio will also have been calculated. If this ratio is greater than 1.0 for a column or wall then it can be said that the selected reinforcement is not sufficient.
Steel Standardisation 
Using this dialog, you can:
- Standardise the steel in the columns between storeys. You can check the steel bars provided in the columns of a particular column line storey by storey and make manual modifications to standardise them.
- Manually input/modify steel bars.
Steel bars of columns with polyline cross sections cannot be modified using the options provided in this dialog.
When a column line is selected in this list, all columns in this column line will be loaded to the table below.
 If you make any modification to the data presented in this table, you need to press “Save” button before selecting another column line, otherwise the modifications will be lost.
Columns with arbitrary cross-sections cannot be edited using this dialog.
Reports Tab
Various reports are available to be printed from the “Report” tab of the “Column Reinforcement Design” form.
Rebar Table 
To print the rebar summary table as it is displayed on screen, click the “Rebar Table” button.
Design Report 
After design has been accomplished the “Design Report” button can be used to print the results.
Column Analysis 
You can use this option to check the capacities of the columns and walls calculated using the supplied steel.
This table is generally used for checking the capacity of an existing building.
Column Forces Listing 
In the column design stage, the most critical member force group (axial load and moments) among all the different member forces resulting from different load combinations in the building analysis, will be selected and used.
Marking the Axes for Printing 
The “Design” and “Print” columns in the table will be marked for the members that have been designed informing you that the members are designed and ready for printing.
The mark in the “Print” column indicates that the member will be included in the output report. When the “Design Report” option is selected, only the members that are marked for printing will be transferred to the output report.
After selecting a member in the table, you can either mark or unmark it for printing by clicking in the “Print” box.
The print marks for all members in the table can be set using the “Mark All Columns” button. Likewise, all print marks can be removed by using “Remove Marks” button.