Template Management Ps 2022
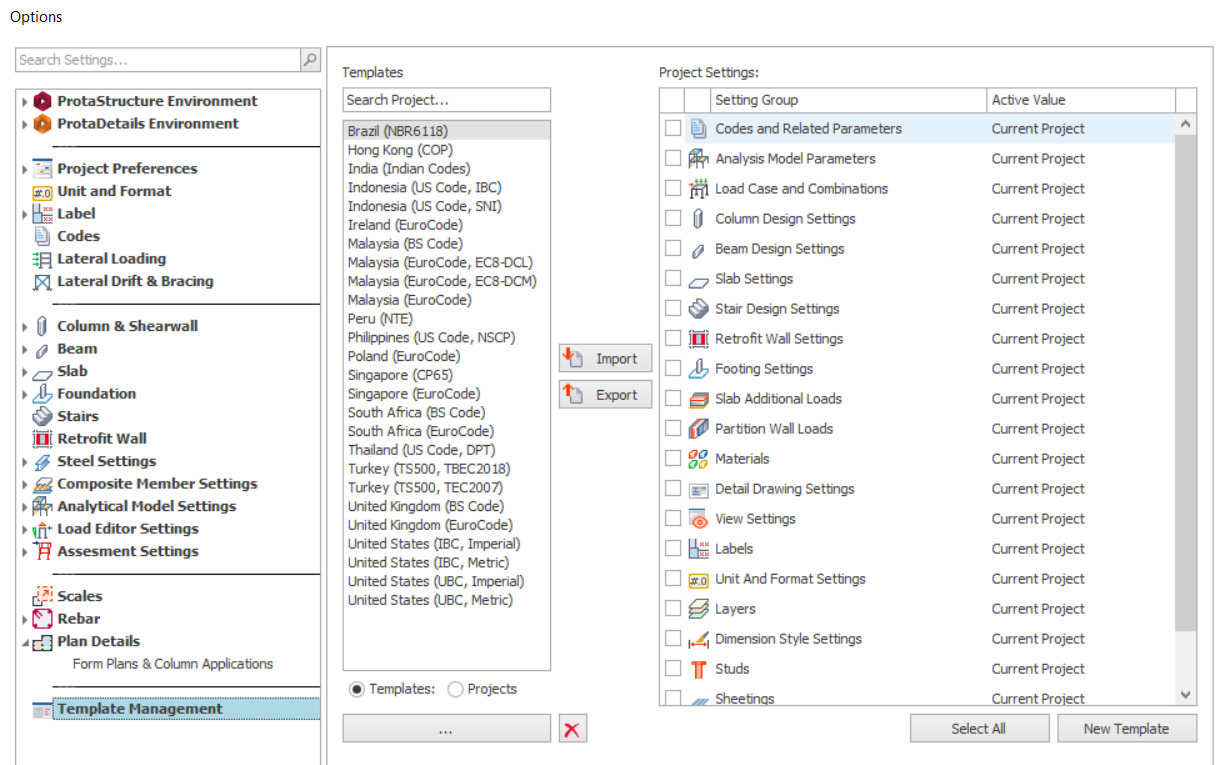
The “Settings Center” is displayed by selecting “Template Management".
It can be used to:
- Establish the initial settings in a new project
- Review and modify settings in the current project
- Swap settings between projects
- Save preferred settings as templates
Settings are divided into two main categories in ProtaStructure:
- System based settings
- Project based settings
System based settings can be displayed by selecting "ProtaStructure Environment" in the "Setting Center". Other settings are considered as project based settings and can be shared between projects.
To establish the initial settings in a new project
Whenever you create a new project the “Settings Center” form will be displayed so that initial settings can be defined by importing from another “Project” or from a “Template”.
- Select the project or template to import from. (If you choose the former, you can navigate to a different "Data Folder" to locate the project required.)
- Click the “Import” button.
- All the settings from the chosen project or template are then imported.
Once imported, the settings are permanently saved with the model. They can subsequently be reviewed/modified by redisplaying the “Settings Center”.
To review and modify settings
You can use the “Settings Center” to review/modify all the settings in the current project.
- Select the settings group to review.
- Make any changes as required.
To swap settings between projects
You can use the “Settings Center” to replace settings in the current project by importing from another project or template.
- Select the project or template to import from.
- Choose individual setting groups to be imported, by checking the appropriate box, or boxes. Unchecked settings are retained.
- Click the “Import” button.
- After settings have been imported the “Current Project” text is replaced with the name of the project/template used in the import.
To save preferred settings as templates
If you have adjusted the settings (possibly to establish a set of company defaults) you can select to “Export” them permanently to a template so that they can be easily applied to future projects.
- Open the project that contains the settings to be exported.
- Display the “Settings Center”.
- Click the “Select All” button if all the settings are to be exported. Alternatively, select the individual setting groups to be exported by checking the appropriate boxes.
- If you want to overwrite the settings in an existing template, ensure the “Template” option is selected, and then select the template name from the list on the left.
- Alternatively, if you want to create a new template, ensure the “Template” option is selected. Click the “New Template” button and type the template name in the box provided.
- Click the “Export” button to copy the selected settings into the template.
Refer to the video "export a new template" in the attachment .
To reset/reimport or change project templates
You can use the “Settings Center” to reset or reimport the initial settings in the current project by importing from the same design template. This is important when the project has corrupted settings during modelling.
If you wish to change the code of practice, it is necessary to import the new project template with the desired code, instead of merely changing the code of practice in the "Code Settings". This is because change of code does not change the other important & related parameters; example in BS8110 concrete density is 24 kN/m3 while for EuroCode is 25 kN/m3.
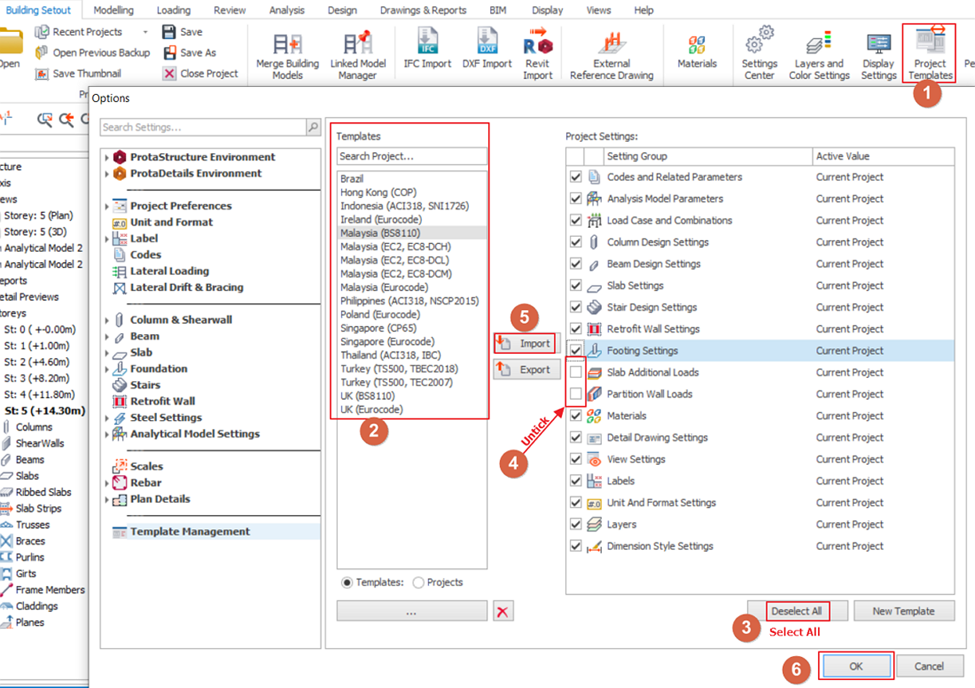
Follow these steps for the above purposes :
- Go to Building Setout tab > Project Templates
- Select your project template.
- Click on "Select all" to select all the project settings
- Untick "Slab Additional Loads" and "Partition Wall Loads" project settings.
(These options are the manual created loading library and normally unrelated to the corrupted setting issues. Therefore can be unticked.) - Click "Import" to start import the template.
- Click "OK" to close the dialogue.
- Adjust the analysis and design parameters accordingly (e.g. remove earthquake parameters, material, design parameter).
- Regenerate load combinations if necessary.
- Rerun Building Analysis

Program will always have its bug fixes or enhancement from time to time in some templates (e.g. additional or removed parameters, etc.). Re-import templates will refresh all the parameters to default settings which take the advantages of these bug fixes or enhancement. If you have your own templates (or project templates), it is recommended you always update your own templates when there is new version is released.
Project Template Folder Directory in Windows
Project Templates are automatically installed in following folder (note this is hidden folder) :
C:Users<Username>AppDataRoamingProtaProtaStructureR?Templates
"?" denotes the number of the version. For example, R5 = PS2021, R6 = PS2022, R7 = PS2024, R8 = PS2025, R9 = 2026
If template files are missing or corrupted, it can be restore by reinstalling ProtaStructure : How to perform a Clean Reinstallation